


 Revealed")


Some Shrines in Tears of the Kingdom have obvious solution. Others, well, if you’ve come across the Mayachin Shrine, which contains a giant target and a big ball that perpetually rolls down a slope, well you might still be standing there unsure what to do.
Like Breath of the Wild before it, Tears of the Kingdom features various shrines for Link to discover and solve. Each is like a little mini dungeon featuring a variety of puzzles that test Link’s various abilities, from combat to crafting with the Ultrahand. Some are fairly obvious, like ones that just require you to stitch together a few logs to cross a yawning abyss. Others demand a bit more from you, be that through difficult combat or seemingly cryptic puzzles with non-obvious solutions. The Mayachin Shrine is one such location, and the solution could be a bit of a head scratcher to anyone who’s not a pinball fan.
The Mayachin Shrine is super confusing at first
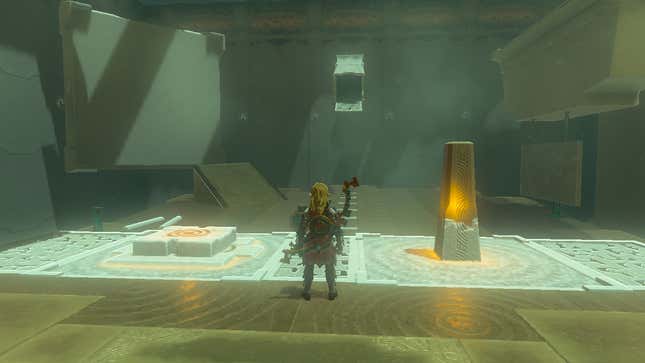
As you enter the shrine, you’ll come across a rotating platform. That’s easy enough: Hop on, hop off. But as you move forward, you’ll see a big button to your left and an amber pillar to your right.
When you step on the button, a big panel off to the left will rotate to reveal a giant target. If you whack the pillar, it’ll turn green, and an object that looks like the top of a ball peen hammer a little further ahead will quickly rotate. Meanwhile, a big-ass ball is continually dropping down from the massive chute on the far side of the room, smacking an object buried in the ground along the way before rolling off into the void and respawning.
Off to the left you can see some other spikes and what look like big pieces of chalk. The two doors on your left and right are sealed by gates. Oh, and there’s a platform suspended by chains off to the right? What the hell does this mean?
Well, let’s break it down.
How to properly (and improperly) solve the Mayachin Shrine and open the chest
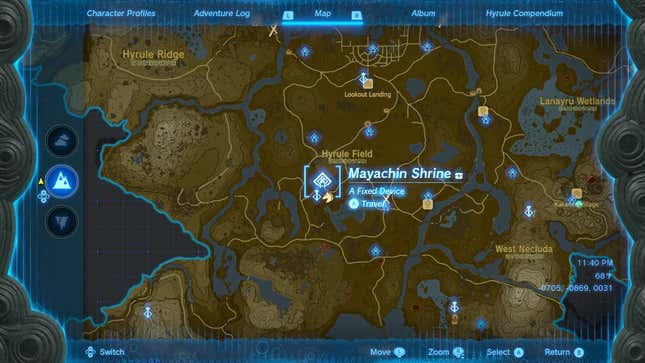
Let’s start by locating the shrine. Mayachin Shrine is located in the Windvane Meadow. That’s ever so slightly southeast from Lookout Landing.
Once inside the shrine, hop over the rotating platform, step on the big button, and then hop down to the sloped platform just ahead of it (take the stairs or mind the gap, as you can fall to your death there).
Grab the spike jammed in the ground just ahead of you with Ultrahand. Bring it back a bit and rotate it with R and the d-pad so the pointy end faces away from you (safety first!). Then just walk toward the hammer-like object and the spike should drive itself in. You now have a spike you can quickly torque by hitting the amber pillar. That’s the first step.
Once the spike is jammed in the rotating mechanism, go ahead and grab those chalk-like pillars and attach them to the end of the spike, so that you basically form a giant paddle. See where we’re going with this?
What happens next is down to timing. One well-timed strike of the “paddle” is enough to send the respawning ball flying to the left, where it will hit the ramp and (hopefully) collide with the target. If you’re having trouble with just the “paddle,” you can also use that other spike as an additional bumper to ricochet the ball against—though getting the positioning correct might be trickier than just perfecting the timing of the more direct, no-richochet method.
Great, that opens up the exit. But what about the shrine’s chest? You need to hit a second target, on the right side of the room, for that.. You can technically hit the target to your right just by doing that, but odds are that the suspended wall on chains might get in your way. If that keeps happening, here’s how to deal with it:
First, grab the ball and position it near the stairs so it doesn’t keep falling and rolling past you, possibly knocking you down and damaging you on top of just being super annoying.
Remove the spike that’s beyond the suspended panel. Then fix it to the reverse side (with the pointy end facing the wall the right-side target is on. This next part is a little tricky and might take a few tries: Grab the hanging wall (with the spike now glued on behind it) with Ultrahand and start rotating and moving it so that it sort of folds against the ceiling. What you’re trying to do is get that spike to embed itself in the ceiling so that it’s permanently pinned there, leaving perfect clearance to hit the target with the pinball paddle you’ve constructed.
As with the main target, striking the second one with the ball might take a couple of tries on its own, but if you’ve cleared the way by pinning that panel to the ceiling, it’ll be a lot easier. Hit the ball when it’s close to the end of the paddle (but not at the very, very tip) and you should be able to hit the chest’s target. The gate to the treasure will open.
Now, there are also a number of other clever ways to solve this shrine. As Twitter user Getty shared, one such solution is simply firing bomb-equipped arrows at the targets.
Other players have just fixed the ball to the end of a very long Ultrahand-made stick and used Recall to get the ball to touch the target, thereby opening up the exit gate.
It also seems that just about any object with enough force will activate the target/switch, as demonstrated by LazyTech whose misaligned paddle broke off and smacked the target.
As with any other shrine in Tears of the Kingdom, there is no “wrong” way to solve these puzzles. The very intuitive crafting system allows for a plurality of clever solutions, some of which might be more interesting than the intended answer.


 Improved Over The Original’s")